

How To Register My Used Tesla
Be information technology an ordinary high school project or a mind-blowing arcing project, a Tesla Coil is always fun to build and volition definitely make your projection look cool and attractive. A Tesla Coil is a simple ringlet that creates a high voltage electric field in the air when a small input ability (9V) is provided, this electric field is strong enough to glow pocket-size light bulbs. This principle was invented pastNicola Tesla, who also holds the credit for inventing Induction Motors, AC current, neon bulbs, Remote controls, etc..
This Mini Tesla Coil Circuit is very uncomplicated and just works with a assist of a 9V battery and very few commonly available electronic components, which makes it is very piece of cake to build (fingers crossed). At that place are a handful number of people who have tried this project already and take failed to obtain the result; this is mainly because of a few subtle mistakes that commonly occur. And so it does non matter if y'all have already given upwards on Tesla coils or if you are completely new to this topic, this tutorial volition be your final finish to build and debug your Tesla curl and become it working. In this DIY tutorial, nosotros will learn How to Make a Simple Tesla Coil with 9v Battery and transmit the power wirelessly.
Warning: This is a high voltage projection, so make sure y'all ever know what y'all are doing. The voltage is not lethal only still can crusade nerve and tissue impairment if y'all become in direct contact with whatever arcs. Y'all don't accept to fear much, but e'er recollect not to touch the coil while it'south powered ON.
Components Required to build a Miniature Tesla Coil
- Magnetic wire a.k.a Enameled copper wire
- 22K Resistor
- 2N2222 Transistor
- LED
- Ordinary breadboard wire
- Any non conductive cylindrical object
- 9V Battery (or 5V Supply)
- Breadboard
Mini Tesla Coil Working:
Before we start building the Tesla ringlet, it is very important to know how it works. Only then we will exist able to build and debug i successfully. The Tesla gyre works with the principle of Electromagnetic Induction. According to which, when a conductor is placed under a varying magnetic field, a pocket-sized current volition exist induced inside the conductor. For a Tesla scroll this conductor will be called as the secondary coil and the varying magnetic field will exist produced by the chief coil by passing an oscillating electric current through the principal coil.
Information technology might sound a bit confused, but allow us keep with the circuit diagram where things volition exist made much clear.
Mini 9V Tesla Roll Circuit Diagram:
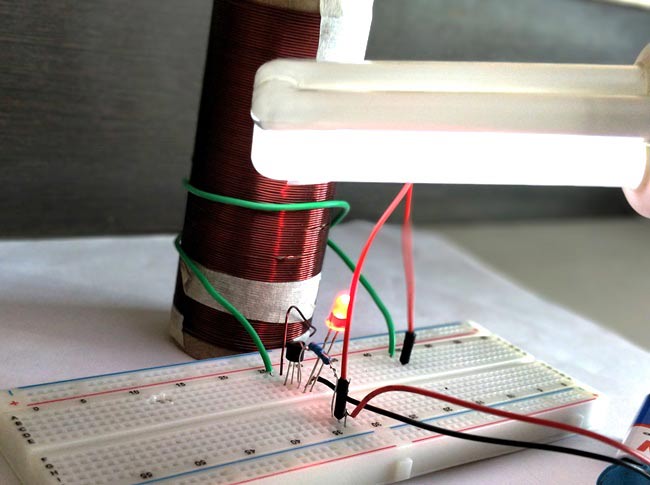
The circuit diagram of Mini Tesla Coil Projection given below is very elementary. So let us understand how it works and learn how to build it. The main component in this mini tesla whorl diagramis the secondary coil (aureate colour), which is fabricated by winding a magnetic wire (enameled) effectually a cylindrical object (whatsoever not conductive object will work).
A high current loftier frequency transistor similar 2N2222 is used to supply current through the primary scroll (violet color). The whole ready is powered by a 9V battery as shown above. The positive end of the battery reaches the collector of Transistor through the principal coil, and the emitter is grounded. This ways that whenever the transistor conducts, current is flown through the master coil. The LED diode and i stop of the secondary curlicue is also connected to base of transistor to make the circuit oscillate, this way the transistor will send a aquiver current into primary roll. If you lot desire go more technical and learn how the electric current oscillates you can Google for "Slayer Exciter Excursion".

So, with this organization we take a primary ringlet which will take an oscillating current, and hence will produce a carrying magnetic flux around it. Now, this coil is wound around the secondary coil and hence a according to law of electromagnetic induction a voltage will exist induced in the secondary coil. Since the number of turns in the secondary coil is very big than primary coil, this voltage will be a very high voltage and hence this coil volition accept a very stiff electric flux around it that is powerful plenty to glow normal CFL bulbs and is used in Wireless Power Transmission.
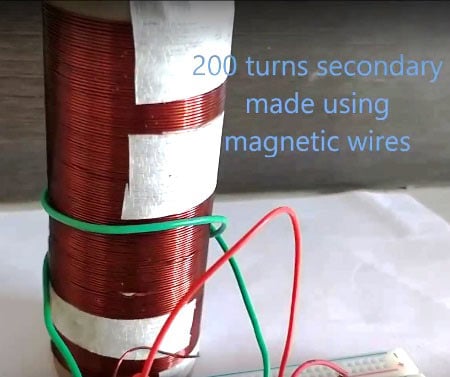
Winding the Secondary Curl:
One very important step in this project is winding the secondary scroll. It is a time consuming process and hence do not blitz yourself in this function. First of all, y'all will demand a magnetic curlicue, which is also called as enamelled curl wire. These wires can exist found inside relays coils, transformers and even motors. Yous tin either reuse one or buy yourself a new ane. The thinner the wire is the ameliorate the results will exist.
Once you lot are ready with the magnetic wire, you will need a cylindrical object. The only rule while selecting this object is that information technology should not be conductive, y'all tin select PVC pipes, paper-thin roll or even stack 4-v A4 sheets together and curlicue them upward. The diameter of the cylinder tin can be anywhere between 5cm to 10cm, and the length should be at least 10cm. The longer the object is more number of turns it tin fit in.
Subsequently getting your coil and cylindrical object, it is time to start the winding procedure, just current of air few turn and use a tape to secure the winding initially and then proceed with the complete winding. Brand sure you lot follow the below tips while winding
- Current of air the coils as close as possible
- Do not overlap 1 curl turn over another
- Try to get a minimum of 150 turns, a value of 300 turns will be typically good.
Common Misconceptions:
Although this circuit works and behaves like a Tesla curl, information technology is far abroad from an actual Tesla coil. The correct proper name for this excursion isslayer exciter tesla coilorPoor mans Tesla whorl.You can learn and have fund with this circuit, but exist advised this is not a Tesla ringlet. That beingness said let'due south proceed with our project. Once we are gear up with the coil nosotros are near 90% through the project after that just follow the circuit diagram and make the connections, but there are a few unremarkably asked "why is my tesla coil not working?" questions to which you tin can notice the answers below.
- Practise non utilise a normal transistor in place of 2N2222, unless you know to select an exact equivalent for this transistor.
- The resistor 22K need not be exactly the aforementioned it tin can be anywhere from 12K to 30K.
- Brand sure the 9V bombardment that y'all are using is brand new, because the cheap batteries will not last more than 5 minutes with this circuit, If yous accept an Arduino or something which tin can source you lot +5V y'all can also use that.
- It is completely fine for your scroll to have any number of turns, but it should take a minimum of at least 150 turns, you dint accept to be very accurate with the count.
- The excursion can work from 5V to 10V. Even so don't push more than 500mA through it
- The LED has a dissimilar purpose other than glowing, information technology is actually used to switch the transistor and then do not ignore it, a Ruby colour LED will piece of work fine.
- Your LED might or might not glow when the Excursion is powered, you lot practice non have to be worried virtually information technology.
- You might or might not get a spark (arc) at the gratis terminate of Secondary coil, you lot do not accept to worry about that either. If you get an Arc do non affect it.
- Always bank check if the circuit is working only past using a normal CFL bulb.
- Adding a metal load (foil paper) on top of secondary coil is optional, just it certain will ameliorate the results but not mandatory to get a bones working output.
- At that place is a very little chance for you lot to hear any hissing audio, and so don't wait information technology.
Structure and Testing of 9V Mini Tesla Coil:
Just follow the steps to air current the scroll and use a breadboard to brand the connexion as shown in the circuit diagram. In one case you are done with everything your mini Tesla scroll project volition look something similar this.
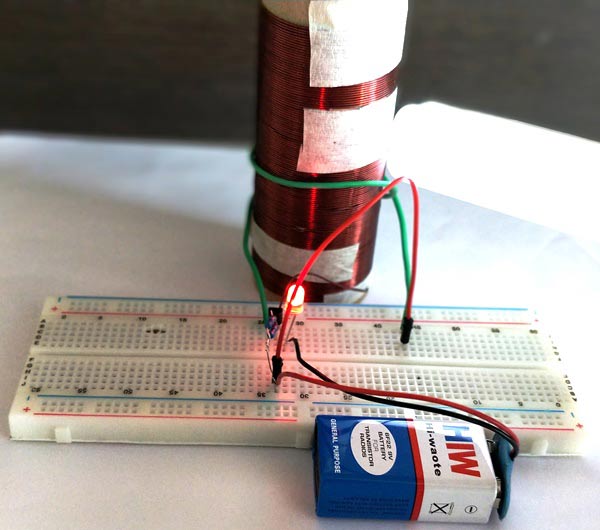
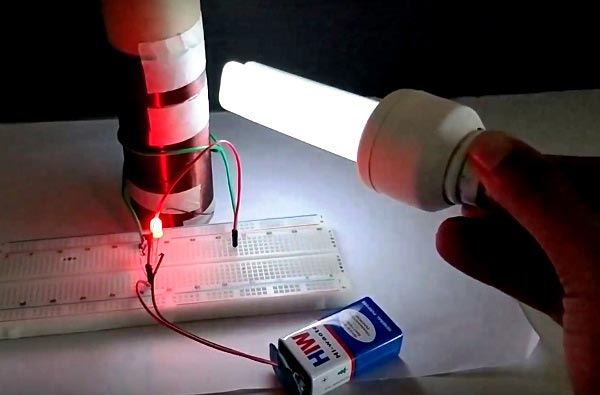
I dint not have a 22K resistor or anything near, so I used two 47K resistors in parallel every bit shown in the circuit. At present, finally it is time to accept fun. Just ability the circuit using a new 9V battery and bring a CFL bulb close to the coil y'all should be able to watch the CFL bulb glow without any connection on its ain only like every bit shown in the video beneath. Y'all can as well attain the same upshot on tube lights every bit well. Become ahead and play around with it, there is a lot more room to improve the projection, past increasing the current rating or past increasing the number of turns on secondary coil to get arcs on the complimentary finish of secondary coil. But, all those things are left for a new tutorial.
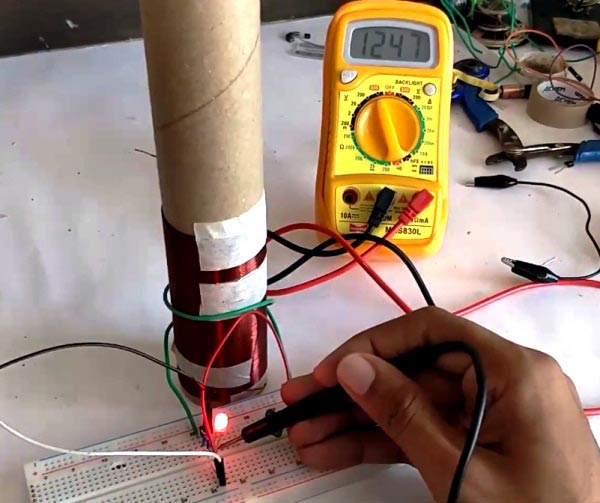
You lot tin can also bank check if the circuit is working past using a mulimeter, simply place the multimeter in voltage mode. Touch on the black probe on the ground of the circuit and leave the red probe floating on the air, the multimeter should be able to read a very high voltage as shown below where the meter reads a very loftier voltage of 1247V. You have been warned already, exist very careful around these high voltage set-up. Learn here How to use a Digital Multimeter.
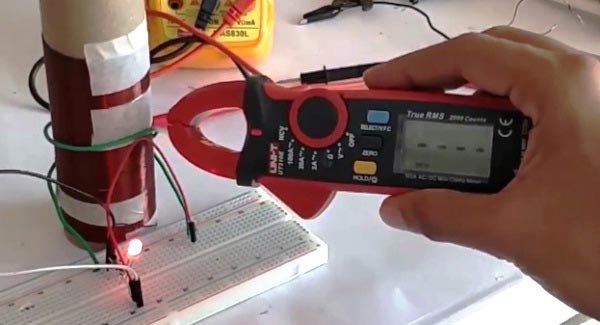
You can also check the presence of Flux by using a Clamp Type Multimeter in NCV mode. When you lot bring the Multimeter near to the curlicue, information technology will start beeping with the flashig light.
But, wait!!!...., what if your bulb does not glow. Don't worry it should be a very subtle trouble somewhere. A well-nigh common solution to attempt out start is change the polarity of your primary curlicue, that is connect the collector end of chief coil to bombardment positive and the battery positive end of principal coil to the collector pin. This should help you to solve the problem. If not, attempt using a new 9V battery or some other reliable power source.
Even then if you lot face up any problem make sure you take read the mutual misconception heading to a higher place and check for your circuit connection. If everything fails feel gratuitous to post your problem as comment below. I will try my all-time to brand your circuit work.

How To Register My Used Tesla,
Source: https://circuitdigest.com/electronic-circuits/how-to-make-a-mini-tesla-coil-9v
Posted by: mendezmagning1940.blogspot.com
0 Response to "How To Register My Used Tesla"
Post a Comment